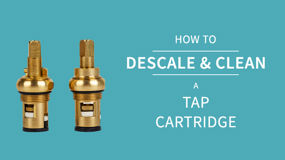
When it comes to cleaning your kitchen and bathroom, it’s not just the surfaces that need a quick wipe down. There’s a whole load of other bits that often get forgotten. Cleaning and descaling your tap cartridge is one of those jobs that, unfortunately, can’t be ignored. The bad news is that it’s a distinctly uninspiring job. The good news is that you don’t need to do it that often.
Sometimes cartridges can be in a position where a simple clean won't help and you'll need to replace your tap cartridge altogether, if you'd like to know more about changing a tap cartridge, check out our other article here.
Cleaning the ceramic disc cartridge in your tap will prevent the build up of limescale. This will disrupt the flow of water - meaning you might be forced into washing your hands with just a dribble - instead of a smooth flow! Limescale is easy to get rid of using the tips we give you in this guide, remember that it’s best to use acid such as vinegar or lemon juice, as opposed to brute force. Being too OTT with your scrubbing will damage the finish underneath the limescale.
If your DIY expertise is limited to flatpack furniture, there’s no need to worry - cleaning and descaling a tap cartridge is a relatively simple job that’ll have you feeling like a DIY king or queen in no time. Plus, once your water flow is back up and running, it’ll save you money.

You Will Need
- Adjustable spanner
- Flathead screwdriver
- Phillips head screwdriver
- Toothbrush
- Vinegar
- Bowl or container
- Clean cloth
Get Cleaning!
- Mix together warm water and a small glug of vinegar in your bowl or container
- Turn off both your hot and cold water using your boiler or isolation valves. Then turn on the tap to allow any excess water inside to drain out
- Use your screwdriver to remove the head of your tap, then remove the nut underneath it
- Remove the tap cartridge using your spanner
- Soak the cartridge in your mixture of water and vinegar for around 10 minutes. This should dissolve any limescale
- If you remove the cartridge and it still has limescale on it, soak it for longer. Another option is to add more vinegar to your mixture, soak your cloth in it and wrap it tightly around the cartridge. Leave this for an hour or two and go get yourself a cup of tea
- Using your toothbrush (well, we hope a spare toothbrush that you don’t plan on using), gently clean around your tap to break down limescale. Remember to clean inside the tap and in the little orifices - then wipe clean with a cloth
- Brush away the limescale from the tap cartridge using the toothbrush, then wipe it clean with the cloth
- Check that every part of the tap is clean and free from limescale, including the washers and ring seals, using your toothbrush to remove any excess
- Put the cartridge back into the body of the tap, covering it with the nut
- Screw the tap head on with the screwdriver, being careful not to overtighten as this will damage the tap
- Turn your water supply back on and check there are no leaks. If your water was flowing badly due to limescale build up, it should now flow freely (or if it’s still flowing badly then we would suggest phoning a plumber!)
Simple & Easy
Cleaning a tap cartridge is a simple job that for some reason fills even the handiest of handymen with dread. Granted, it’s not the most exciting of DIY jobs, but admiring your free flowing spotless tap at the end of a tough 15 minutes work is a great feeling.
If you severely doubt your ability when it comes to descaling your tap cartridge, or you just can’t be bothered, we’d recommend phoning a plumber. If you really don’t know what you’re doing, you might damage your tap which would cost you a lot of money in the long-run. Likewise, if something goes wrong while you’re doing it, try not to wing it. Instead, call in a professional.
If you’re feeling like you want to put your DIY skills to the test once more and fancy upping the challenge, we’ve got a whole load of DIY advice for getting your bathroom in tip top condition. Check out our blog which is packed full of DIY challenges and recommendations. Please remember that if you have any trouble, you can always contact us.


